Inexpensive Router Network with DD-WRT
Introduction
Setting up wireless networking can be a frustrating experience. Available commercial routers vary greatly in their implementation and standards compliance, meaning that compatability between brands of router can be problematic. There are also significant security issues in implementing WiFi netowrks, compounded by the fact that manufacturers rarely update their firmwares and dump support for routers after only a few updates.
Thankfully, there are now some great options for installing open-source software on routers so that it’s easier to have cross-compatibility and maintain up-to-date security patches. The two main open-source software stacks for WiFi routers are: OpenWRT and DD-WRT. In fact, they are related to each other, with OpenWRT providing a lot of code for DD-WRT. They also serve slightly different interests, OpenWRT is focused on providing an open and modular architecture, ideally allowing low-level access to the nuts and bolts of router features, while DD-WRT aims for simplicity of use with a consisten user interface. There are also other open firmwares with narrower scopes, for example Xwrt-Vortex, Tomato, Advanced Tomato and Gargoyle which provide enhanced features for a smaller subset of routers (generally based on the Broadcom chipsets).
Which brings us to the chipsets… each router uses particular types of silicon chip to control its functions. These primarily act as a CPU and wireless chip(s). In fact, most of the CPUs in modern routers are using a base intruction set built on the MIPS or ARM architectures with custom additions for the WiFi protocols. There are only a few vendors that produce commercial routers, they are:
| chipset | features | limitations | common routers (DD-WRT compatible) |
|---|---|---|---|
| Broadcom | good compatibility | Netgear R7000(P) | |
| Qualcomm Atheros | more open | ||
| Marvell | higher speed | no VLAN tagging | Linksys WRT1900AC, WRT1200AC, and WRT1900ACS |
This was my third generation of routers, having first used the Linksys WRT54G, then the Linksys E3000 routers. These worked quite well, but were showing their age (both in speed and reliability with overheating issues). It was time to retire that router network and upgrade.
Aims
- open-source firmware compatible
- high reliability, 5 year lifetime aim
- low cost
- avoid ethernet cabling between floors and zones
- high speed on all network segments
- all devices on the same subnet
- compatible with NBN HFC (VLAN 2)
- good inter-router connection support (with WDS or router bridge)
Implementation plan
The first job was to look for a compatible router. In particular I wanted a reasonably priced, mid-range router that was easy to flash to DD-WRT. It needed to support VLAN tagging (for it to work with NBN HFC). Some people prefer to have a higher speed gateway router as Router 0 but I generally like all my devices to be identical as it makes compatibility, maintenence and repair of a network simpler when all devices are identical and interchangeable.
Considering the above factors, I chose the Netgear R7000P router as the test platform. It was relatively low priced, easily available and had a Broadcom chipset, which was likely to work with NBN HFS VLAN tagging without issues. It also had good doumentation on the DD-WRT website and many users who had used it or the previous model (the R7000).
To check the router, I used the DD-WRT Router Database and read relevant forums to check compatibility. I also check the OpenWRT Supported Devices site to ensure I could use OpenWRT in the future if necessary. The information on these forums can be quite confusing at times, largely because there can be changes from version to version or hidden incompatibilty issues. That’s part of the reason for writing this post, so that it can show a working configuration for reference!
The layout of the network location required 3 routers for best coverage, as show in the diagram below:
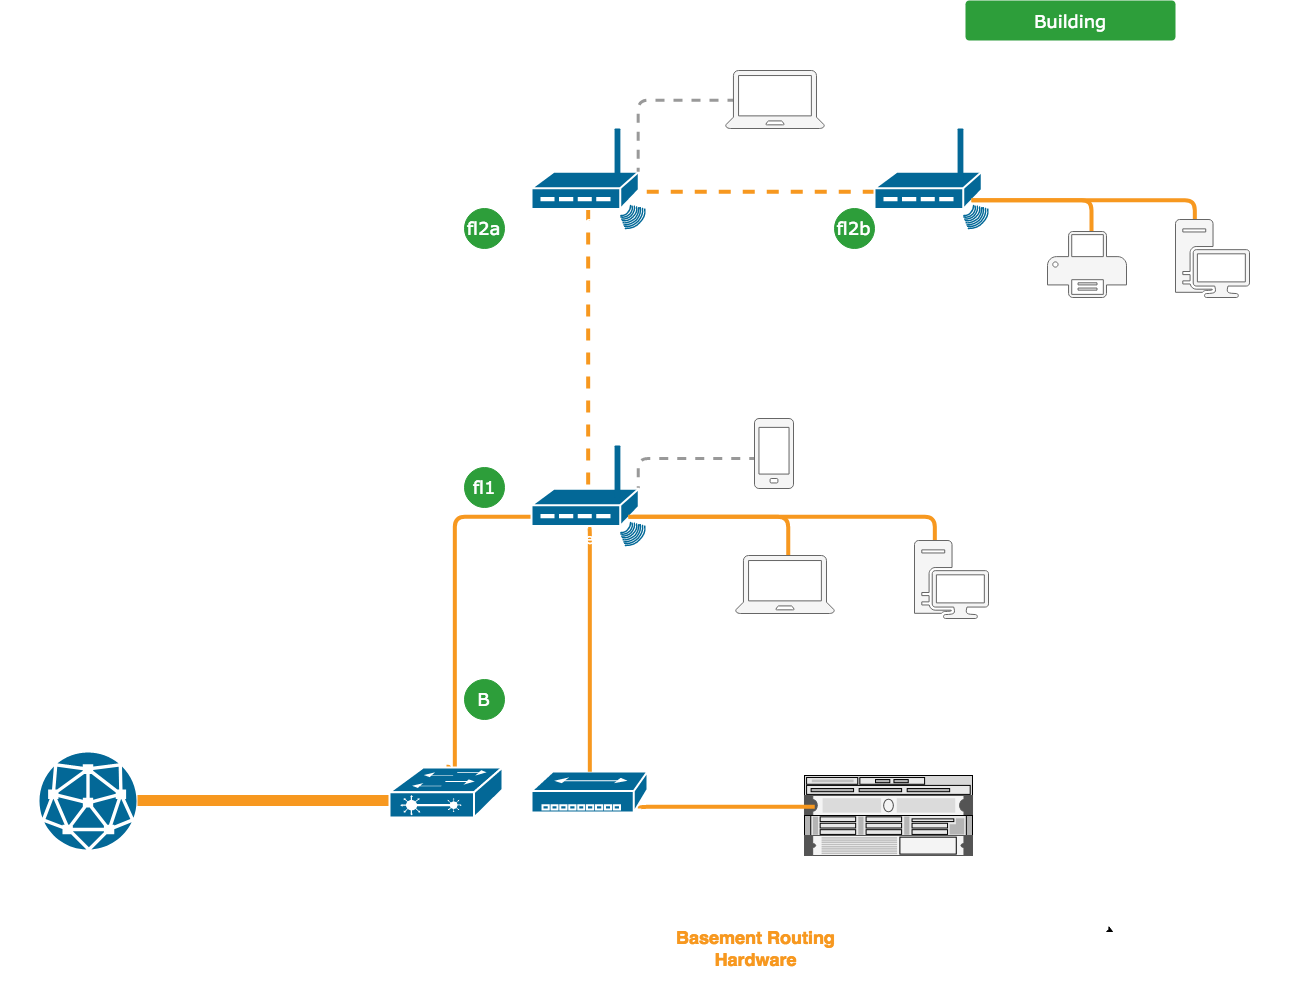
The dotted lines indicate wireless links, with the dedicated WiFi links between routers shown by orange dotted lines. Two routers were required on floor 2 to achieve coverage but I wanted to be able to connect wired devices to the terminal router in the chain.
Build
Flashing routers
Thankfully, flashing the routers was quite simple, the firmware version I used was DD-WRT BrainSlayer v3.0-r41212. This was downloaded from ftp://ftp.dd-wrt.com/betas/2019/09-30-2019-r41212/netgear-r7000P/ .
-
Initial Flash to DD-WRT
- connect ethernet and go to 192.168.1.1
- run through wizard and log into router
- go to
Advanced" >> Administration >> Router Update - upload
factory-to-ddo-wrt.chkv3.0-r41212 (09/30/19) - you will receive a warning, but continue
- wait for reboot (6 white lights)
-
Upgrade Flash to full version
- go back to 192.168.1.1
- login and upgrade firmware with
netgear-r7000p-webflash.bin - reboot and continue
Getting Connected to the Internet
The first task was to connect to the NBN service using Router 0. The NBN HFC modem was connected to the router’s WAN port by ethernet cable.
Then, the router was configured with the following settings:
Setup > Basic Setup >:- WAN Connection Type:
PPPoE - Router Name:
ROUTER0 UsernameandPasswordas per ISP settings- Router IP:
192.168.1.1with Netmask255.255.255.0 - DHCP Server:
Enable - Use DNSMasq for DNS:
Yes - DHCP-Authoritative:
Yes
- WAN Connection Type:
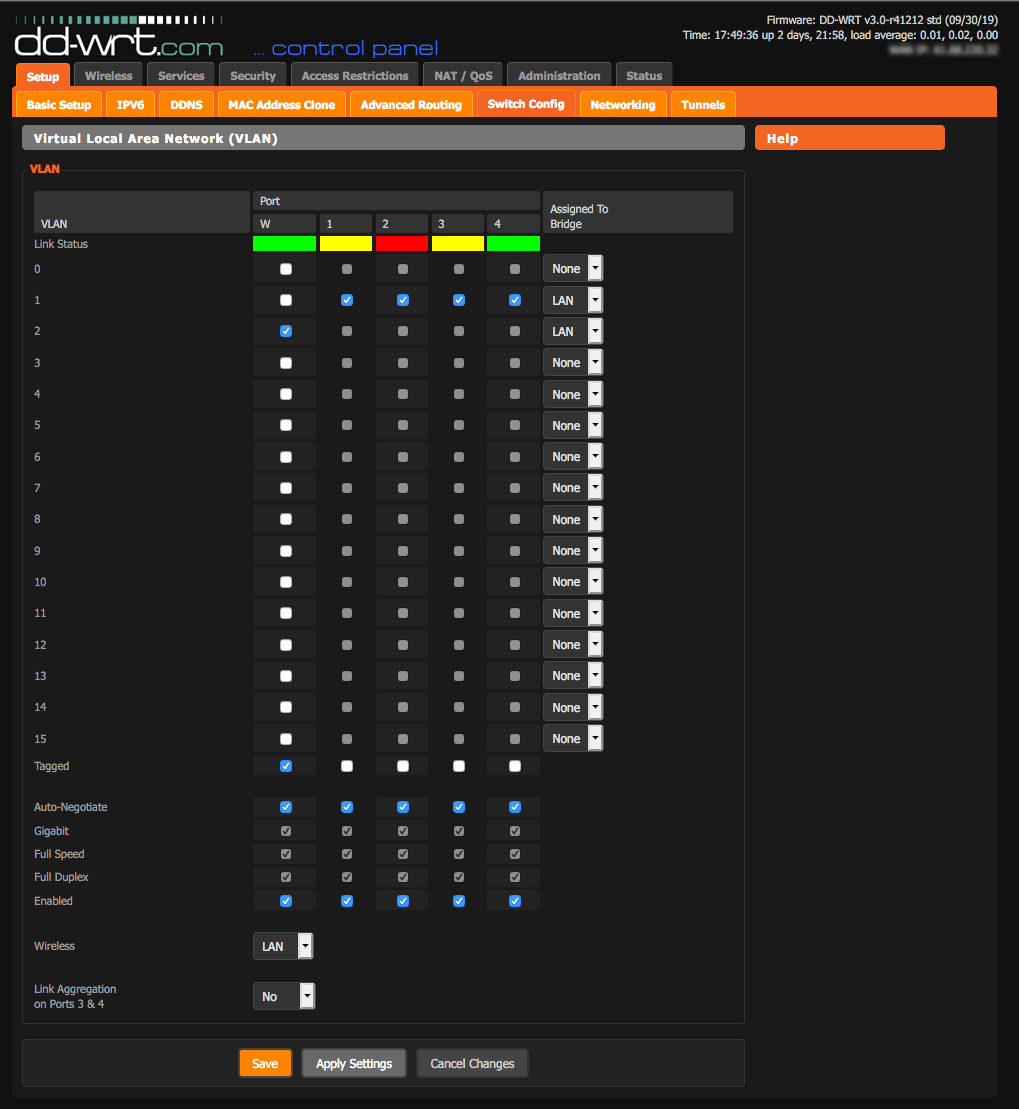
Setup > Switch Config:- Select
Taggedon theWANport - enable
Dynamic RoutingforLAN and WLAN
- Select
Security > FirewallEnableFirewall and select the following options- Block WAN Requests
- Block Anonymous WAN Requests (ping)
- Filter Multicast
- Filter IDENT (Port 113)
- Block WAN SNMP access
Wireless > Basic Settings- Interface
wl0(2.4GHz)- Wireless Mode:
AP - Wireless Network Mode:
NG-Mixed - Wireless Network Name:
BRIDGE - Wireless Channel: pick one and keep it the same for all the routers, e.g.
6 - 2.437 GHz - leave the other settings at their defaults
- Wireless Mode:
- Interface
wl1(5GHz)- you can set this interface however you like, it doesn’t matter for the bridge
- Interface
Wireless > Wireless Security- Interface
wl0(2.4GHz)- Security Mode: `WPA2-PSK
- WPA Algorithms:
CCMP-128 (AES) - WPA Shared Key: this is the password for WiFi login, make a strong one
- Interface
wl1(5GHz)- again, you can set this interface however you like, but please use a strong protocol like WPA2-PSK
- Interface
That was all that was needed to get a good connection, tested with Speedtest. The service was rock solid, no dropouts and good speed for HFC.
Configuring Router Bridge
All devices needed to be on the same subnet, this permitted any user to print across the network and for all users to be able to access the data server in the basement. I intended to connect the routers via either of two protocols: WDS or Repeater Bridge Network. A comparison of the the protocols is shown here. More general information about Linking Routers is also available on the DD-WRT Wiki.
I initially tried WDS mode but had some problems with the DHCP server not propagating to the downstream routers.
This may have been due to the names I chose for the wireless access points, as I had underscores in the names which sometimes causes issues. There were also a number of forum posts which suggested that WDS can be quite unreliable and difficult to debug. I may try it again in the future.
So I decided to set up the network using a Repeater Bridge Network.
For the network, we need to set the routers with individual IP addresses on the same subnet, for instance:
Router 0: 192.168.1.1Router 1: 192.168.1.2Router 2: 192.168.1.3
The following apply to Router 1 and Router 2, but make sure the names. SSIDs and IP addresses are different for each router.
After each of these steps, you’ll need to press the Save button and then when all the steps are finished, press Apply Settings to enable the changes.
- Log in to the GUI of the target router (via ethernet is easier while changing settings)
- Set the IP address and basic network settings
Setup > Basic Setup >:- WAN Connection Type:
Disabled - Router Name:
ROUTER1(or ROUTER2 for the third router) - Router IP:
192.168.1.2or192.168.1.3with Netmask255.255.255.0 - Gateway:
192.168.1.1and Local DNS:192.168.1.1(same as IP forRouter 0as this is our gateway) - DHCP Server:
Disable(this option will disappear once we enable to wireless bridge) - Assign WAN Port to Switch:
Yes(we may as well get an extra ethernet port)
- WAN Connection Type:
- Set up the wireless settings to match the Host router
Wireless > Basic Settings:- Interface
wl0(2.4GHz)- Wireless Mode:
Repeater Bridge - Wireless Network Mode:
NG-Mixed(must be the same as above) - Wireless Network Name:
BRIDGE(this must be the same as above, avoid special characters) - Wireless Channel: pick one and keep it the same for all the routers, e.g.
6 - 2.437 GHz - leave the other settings at their defaults
- Wireless Mode:
- Add
Virtual AP(which allows us to still connect on the 2.4GHz radio separate to the BRIDGE)- Name (SSID):
VIRTUAL1(orVIRTUAL2forRouter 2)
- Name (SSID):
- Interface
wl1(5GHz)- you can set this interface however you like, it doesn’t matter for the bridge
- Interface
Wireless > Wireless Security:- Interface
wl0(2.4GHz)- Security Mode: `WPA2-PSK
- WPA Algorithms:
CCMP-128 (AES) - WPA Shared Key: this is the password for WiFi login, must be the same as the host!
- Interface
wl0.1(Virtual 2.4GHz)- Security Mode: `WPA2-PSK
- WPA Algorithms:
CCMP-128 (AES) - WPA Shared Key: this is the password for WiFi login on the virtual interface, make a strong one
- Interface
wl1(5GHz)- again, you can set this interface however you like, but please use a strong protocol like WPA2-PSK
- Interface
- Disable the firewall
Security > Firewall:- Uncheck all boxes… except
Filter Multicast - click
Save - then
Disablethe SPI Firewall
- Uncheck all boxes… except
- Disable DNSMasq
Services > Services:disableDNSMasq
- Change the network mode to
RouterSetup > Advanced Routing:- Operating Mode:
Router
- Operating Mode:
- Apply Settings, wait for reboot and log back in to see if it’s all worked
- Check internet connectivity: try to ping the second router from a client plugged into the ethernet port, then try to ping the primary router, and finally try the internet.
- Reboot the router if not working
Have a look at the DD-WRT Wiki if it’s not working.
Results/Testing
My internet speeds directly from Router 0 are approx 41MBps Download and 18MBps Upload.
I tested speed with computers connected to Router 1 and Router 2 via ethernet and 5GHz WiFi. There’s not much point providing a breakdown of results, every interface gave full internet speed (of course with some minor attentuation as I got further from the routers).
Connectivity was excellent, with all devices able to ping one another and discover resources on the network.
Bridge routing protocols can apparently have some issues with MAC addressing, but I haven’t had any issues yet.
To test throughput from my workstation (connected to Router 2) and the data server (connected to Router 0), I ran iperf3.
To test, we run the following commands:
computer 1: set up as listener
iperf3 -s
computer 2: start the test to host computer1
iperf3 -c computer1
the output will look something like this:
[ ID] Interval           Transfer     Bandwidth
[  5]   0.00-1.00   sec  10.1 MBytes  84.5 Mbits/sec
[  5]   1.00-2.00   sec  8.76 MBytes  73.5 Mbits/sec
[  5]   2.00-3.00   sec  8.96 MBytes  75.2 Mbits/sec
[  5]   3.00-4.00   sec  10.5 MBytes  87.8 Mbits/sec
[  5]   4.00-5.00   sec  9.74 MBytes  81.7 Mbits/sec
[  5]   5.00-6.00   sec  9.65 MBytes  81.1 Mbits/sec
[  5]   6.00-7.00   sec  7.46 MBytes  62.5 Mbits/sec
[  5]   7.00-8.00   sec  8.81 MBytes  73.9 Mbits/sec
[  5]   8.00-9.00   sec  10.2 MBytes  85.4 Mbits/sec
[  5]   9.00-10.00  sec  9.35 MBytes  78.4 Mbits/sec
- - - - - - - - - - - - - - - - - - - - - - - - -
[ ID] Interval           Transfer     Bandwidth
[  5]   0.00-10.00  sec  93.5 MBytes  78.4 Mbits/sec                  sender
[  5]   0.00-10.00  sec  93.3 MBytes  78.3 Mbits/sec                  receiver
The speed between these computers was 78.3 Mbits/sec (bidirectionally). I’m more than happy with that considering it’s traversing two wireless bridges. It’s possible the speed could be improved somewhat by increasing the channel width to 40 MHz, but I’m very happy with how it is and would not like to sacrifice any stability (currently running without dropping any packets at all).
Of course, some speed will be lost when the routers are busy moving data to multiple client machines, but so far there’s been plenty of overhead.
There is very little load on the routers which is also good to see.
Conclusions
This experiment in setting up an inexpensive wireless repeater bridge network with open-firmware proved to be quite successful. It’s good to see that the hardware and software available have both improved significantly in the last 5 years. The network has better range than with my old Linksys E3000 routers, is compatible with NBN over HPC and provides a solid connection without significant slow down over the bridges. I’d highly recommend both the Netgear R7000P routers and DD-WRT for this sort of network. I was expecting a lot more tweaking to be necessary to get the network going and was pleasantly surprised with how well the open firmware worked with these routers.